在介绍httpfile文件和Vite, esbuild, Rollup整合后,接下来就应该轮到Sprig框架啦 :)
Spring 6.0 HTTP Interface
Spring 6.0 HTTP Interface 是Spring 6.0一个非常核心的特性。 你不需要使用WebClient这类HTTP客户端开发包进行HTTP请求调用,而是调整为基于Interface接口 + Annotation方式,样例代码如下:
@HttpExchange("https://httpbin.org")
public interface HttpBinClient {
    @GetExchange("/ip")
    MyIp myIp();

    @PostExchange("/post")
    Mono<PostResponse> post(@RequestBody String body);

    record MyIp(String origin) {
    }

    record PostResponse(String url, Map<String, String> headers, String data) {
    }
}
通过声明HTTP Interface方式,我们不用再编写调用HTTP Client API相关的代码,而且也不用关心具体使用哪个HTTP SDK,WebClient、OkHttp等都可以随意切换。
接下来就是初始化HTTP Interface,我们只要选择某一HTTP Client的适配,然后使用httpServiceProxyFactory创建基于HTTP Interface的Java Proxy,代码如下:
WebClient webClient = WebClient.builder().build();
HttpServiceProxyFactory httpServiceProxyFactory = new HttpServiceProxyFactory(WebClientAdapter.forClient(webClient));
httpServiceProxyFactory.afterPropertiesSet();
HttpBinClient httpBinClient = httpServiceProxyFactory.createClient(HttpBinClient.class);
System.out.println(httpBinClient.myIp().origin());
httpfile for Spring
在实际的开发中,我们通常会创建http文件进行对应的服务测试,这样是确保服务正常运行,也方便你了解对应的服务接口。 而且如果后续服务有什么问题,你点击一下就可以重新测试服务,非常简单明了。
### get my ip
//@name myIp
GET https://httpbin.org/ip

### Post test
//@name postTest
POST https://httpbin.org/post
Content-Type: application/json

{
  "hello": "{{nick}}"
}
既然已经写了http文件,那么能否服用该文件,直接将其用到HTTP服务调用上呢?借鉴Spring 6.0 HTTP Interface的思想,我们稍微进行了一些调整,样例代码如下:
@HttpFile("httpbin.http")
public interface HttpBinService {
    @HttpRequestName("myIp")
    MyIp myIp();

    @HttpRequestName("postTest")
    PostResponse postTest(String nick);

    @HttpRequestName("graphqlTest")
    PostResponse graphqlTest(String nick);

    record MyIp(String origin) {
    }

    record PostResponse(String url, Map<String, String> headers, String data) {
    }
}
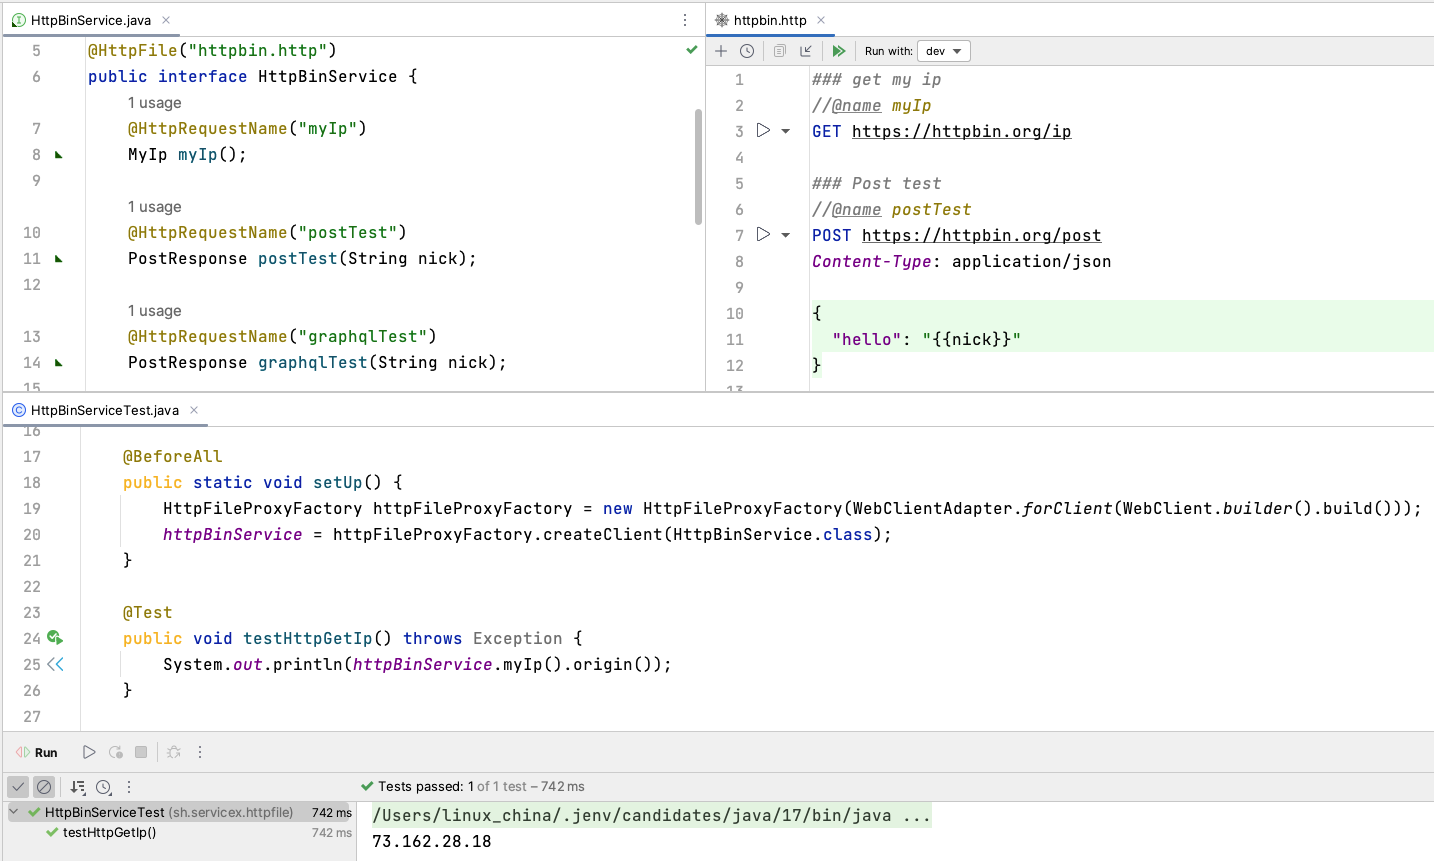
稍微说明一下: 我们使用@HttpFile注解将Interface和http文件进行关联。在具体的API上,我们使用@HttpRequestName注解,将接口方法和http文件中的请求名称进行关联。
接下来同样是HTTP Interface接口初始化,这个和Spring 6.0的HTTP Interface初始化方式是一样的,代码如下:
HttpFileProxyFactory httpFileProxyFactory = new HttpFileProxyFactory(WebClientAdapter.forClient(WebClient.builder().build()));
HttpBinService httpBinService = httpFileProxyFactory.createClient(HttpBinService.class);
System.out.println(httpBinService.myIp().origin());
使用httpfile方式后,HTTP interface精简非常多,你不要再关心@PostExchange,@RequestHeader,@RequestBody等Annotation的使用,这些交给http文件处理就可以啦。
再回到具体的调用方式,如HTTP POST,你需要构建对应的body,然后再以@RequestBody String body函数参数方式添加到API声明中,最后你要在代码进行对应的body构建。
而httpfile方式,你不需要构建body,body的内容已经在http文件中进行定义啦,你只要传递对应的模板变量就可以,当然这些变量都是通过API函数的参数传递的,
也就是你看到到PostResponse postTest(String nick);这样方式,其中nick参数就http文件中的模板变量。
看一下最终的效果截屏:

考虑到http文件是支持GraphQL测试的,所以httpfile spring增加了对GraphQL的支持,GraphQL over HTTP请求如下:
### graphql test
//@name graphqlTest
GRAPHQL https://localhost:8787/graphql

query {
   welcome(name : "{{nick}}" )
}
然后你声明一下GraphQL请求,GraphQL的响应json主要包括data, extensions和errors,所以创建一个GraphqlResponse record即可,Java代码如下:
@HttpFile("httpbin.http")
public interface HttpBinService {

    @HttpRequestName("graphqlTest")
    GraphqlResponse graphqlTest(String nick);

    record GraphqlResponse(Map<String, Object> data, Map<String, Object> extensions, List<Object> errors) {
    }
}
总结
对比Spring 6.0的HTTP Interface,http文件方式在某些场景更简单和灵活,如HTTP body为JSON时,你只要使用模板变量方式即可,没有必要去构建整个json数据,然后再以body方式提交HTTP请求。 当然httpfile文件也有一些缺点,如http body是完全动态的,那么这个时候可能就不太合适啦,你需要在代码中去构建body,然后再以body方式提交HTTP请求。
总的来说,绝大多数的HTTP调用场景,你通过httpfile + Interface关联方式就可以解决,关键是非常简单明了。而且其他的场景,你可以选择HTTP Interface声明方式,当然你直接调用HTTP Client也没有问题。
最后项目仓库地址: https://github.com/servicex-sh/httpfile-spring 欢迎Issue和PR。
